Jen Wiss-Carline is a speara and keen coastal forager. In this series of posts, she shares some tips on how to make the most of the free food waiting to be found along our shores.

In my previous posts, I’ve introduced foraging on the coastline and what you can find along the seabed at low tide. Now I hope to inspire you to take your foraging to the next level by exploring the shallow waters. If you’re willing to put on a wetsuit, snorkel, mask and fins, more impressive species await you, with many attainable from close to the surface. In fact, if you’ve ever considered spearfishing, this is a great stepping stone into the sport.

Venturing out just a little way, you can find lobsters, crabs, spider crabs (large and the easiest of all), octopus and kina – all beautiful fresh food to fill both your table and freezer. Safety rules first: don’t go out alone. Even if you’re not planning on diving down, always have a buddy with you in case you get into trouble.

Regulations

Be sure to read my first post in this series which covers regulations on coastal foraging. In particular, there are regional minimum sizes for lobsters, crabs, crawfish and the like, to ensure these species have the chance to breed before they are harvested. 

Gear

I’ve written a longer guide to my recommended foraging gear here. Not all of this gear is essential but you will find it allows you to stay in the water more safely and for longer, and to search under the surface for the best finds.

A mask, snorkel and underwater torch are all essentials – these will allow you to comfortably explore below the surface without having to dive.

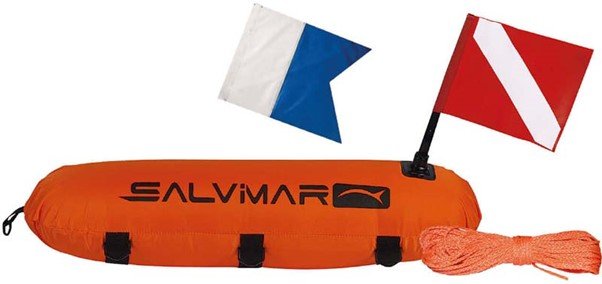
A float is also an absolute must: not only is this handy for attaching your catch bags, but most will have a surface marker (e.g. a flag) to make you visible to others such as boats in the water – a really important safety consideration.

You’ll also be surprised at just how much difference a cheap pair of plastic fins will make to your experience. Swimming with your feet alone is pretty slow and laborious – you’ll get nowhere fast. Fins give you more speed and control, so you’ll have a more successful day and they’ll help you to stay safer.

Other items I recommend include a wetsuit, gloves and socks, a knife, belt and dive weight. Each of these has their uses:  whether safety or protection.

A gauge is also a handy bit of kit, whether you’re foraging on the shore or in the water. It allows you to check the size of your catch and ensure it meets legal limits. You’ll typically be measuring the carapace, which I’ve explained with some diagrams in my post here. Finally, there are a host of gadgets such as hooks and gaffs that can help you tease stubborn crustaceans from their holes while keeping your fingers away from their nippy claws.

A float helps you be more visible in the water to boats, dive buddies and other water users.

Crabs

Brown/edible

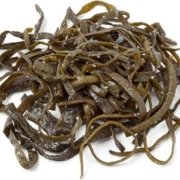
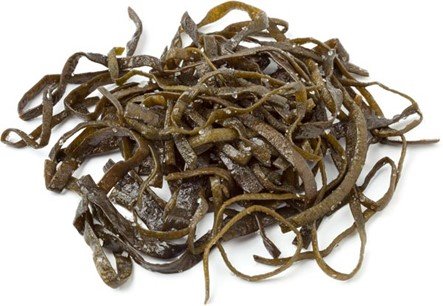
To find brown / edible crabs you want to be looking under the seaweed for little caves, cracks and holes. These tasty critters will often be sleeping tucked snuggly into a tight crack. You best chance is your first chance while they are still slumbering.  You’ll need a hook or gaff to slide behind them to quickly work them out. Once extracted, hold them by their back legs where their claws can’t reach you.  A waterproof torch will serve you very well in your quest for finding these.

Most by-laws put the minimum size for their carapace (the distance across the longest part of their body) at around 160mm for male and 150mm for female, so leave small crabs where you find them.
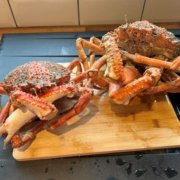
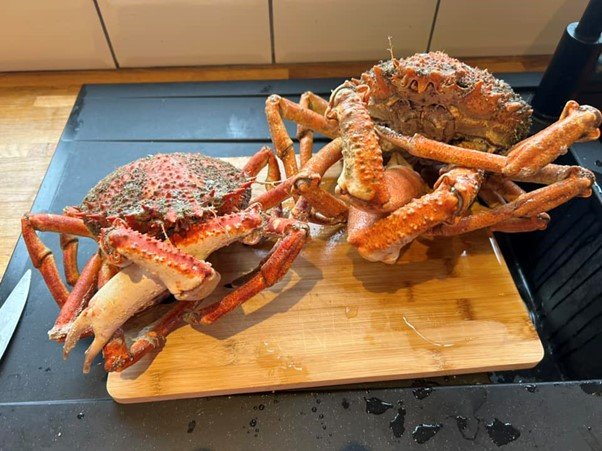
Spider crabs

Spider crabs are such a great catch, given how large they are. In summer, they venture into the shallow water to breed and you’ll find them walking around in the open or in piles reproducing, which makes them a very easy target. Look for the males with their fatter claws as these have more meat and are less hassle to clean and cook. Grab them, tip them onto their backs and they’ll just curl up and fall asleep – easiest dinner ever. The minimum size is typically 130mm for the carapace.

Spider crabs – image credit: Richard Bond

Lobster

Lobsters are your ultimate goal: they cost a fortune in supermarkets and restaurants, but they’re fresher and free from the sea! The best months to find them are May to October.

In the UK they are dark blue – the red colour you are probably expecting comes from cooking.

To find lobsters, you’ll need to be comfortable diving down, although you don’t need to go more than a few metres (remember, don’t go alone). You’ll need to explore all the holes and cracks amongst the kelp, using your torch for guidance. When you find one, mark the spot with your torch and return to the surface. Spend some time catching your breath so you’re comfortable and can maximise your breath hold.

When you dive again, put your hook over the lobster’s back and between its legs, then quickly hook it out. Lobsters are really fast so you need to grab them quick on their back, above the tail and clear from the claws.

The minimum size is typically 90mm for the carapace and also be aware that you MUST release any lobster that has a V cut into its tail, or has eggs underneath.

Lobsters – image credit: Mat Coombe

Octopus

Octopus also like hiding in holes and you’ll need your torch to find them, together with a gaff hook to get them out. Minimum sizes are usually around 750g but aim for bigger as they won’t usually have started to breed at that weight. They are intelligent creatures and you should dispatch them quickly and humanely by stabbing them between the eyes.

Kina

You’ll find the larger kina in the water along rocky reefs, growing up to 15cm. These are best foraged in season (with the spring bringing them on), as it makes a huge difference to their taste. They are eaten raw and must be caught alive. Crack them open with a knife, shake out the guts and eat the remaining colourful yellow or orange roe.

You can find more tips on foraging crabs, lobsters and octopus here.

All images licensed through Envato.

Jen Wiss-Carline is a speara and keen coastal forager. In this series of posts, she shares some tips on how to make the most of the free food waiting to be found along our shores.

In my previous posts, I’ve explored foraging for cockles, mussels, scallops, winkles, and oysters. These tasty finds from the shore have, I hope, added some exciting flavours to your table! Now, in this third part of the series, I’ll introduce the world of whelks, clams, and seaweeds – the latter being available in abundance, much tastier than you might have imagined and absolutely crammed with nutritional benefits.

If you missed my first post, I highly recommend reviewing it for essential information on the best gear to use and understanding local regulations to ensure sustainable and legal foraging. Get ready to discover even more ways to fill your larder from the seabed!

Clams

We have a few species of clam in the UK: razor clams are the long almost rectangular ones and get their name from looking like the old-fashioned cutthroat razor blades people use to shave with. Clams will often hear you coming as you approach and bury themselves into the sand. I picked up a nice trick off TheFishLocker for catching these: look for the little air holes in the sand and pour regular table salt into it. If there’s a clam under the hole, you can watch the hole reform as it tries to get rid of the salt. Keep going with the salt until the clam pops out. Of course, you can use clams for clam chowder but they’re also great steamed and only take about 7 – 10 mins in a pot with a lid. The usual white wine and garlic works really well with these.

Whelks

The calcium powerhouse of the sea, these are the marine snails with the pretty swirling pointy shells. I recommend extra washing for these and a couple of hours soaking, then boiling in salt water for 10-15 minutes. A simple garlic butter makes these a real show stopper at dinner parties.

The Weeds

Humble seaweed is sometimes overlooked or thought of as too smelly or strong. In fact, there are more than 650 species of seaweeds on our shores, and many of them are delicious, tender and not at all pungent. Seaweed is absolutely cram-packed full of vitamins and minerals which is probably why so many health food companies are now jumping on the seaweed wagon to sell us expensive seaweed preparations and supplements.

Of course, on the coast you can harvest seaweed for free! It’s easy to identify and rocky shores are absolutely abundant with it, so you’ll never come home empty handed. All species that you collect from the shore are edible, although some are better to eat than others. Take care to collect live weeds that are still attached to the rock from an area where the sea has washed over the weeds in the last day. Wash the seaweed very well before use.

 Seaweed is a valuable part of our shores: it provides essential habitat and food for a lot of marine life, offering shelter and breeding grounds; it helps improve water quality by absorbing excess nutrients; it absorbs carbon dioxide and it helps protect shorelines from erosion. For those reasons and more, we need to look after the weeds which means taking care when we harvest them. They cling onto rocks by holdfasts and we need to leave those holdfasts in place together with plenty of the stem (stipe) so the seaweed can regrow.

Some of my favourite tasty seaweeds include Sea Lettuce thrown raw into a salad, Sea Spaghetti cooked and eaten a bit like pasta, Dulse thrown into my morning omelette and Channelled Wrack chucked into a stir fry. I recommend subscribing to the Forager Helper for guidance on seaweed identification.

In my next post, I’ll encourage you to venture into the shallow waters to forage for even bigger bounties: crabs, lobster, spider crabs, kina, and octopus.

All images licensed through Envato.

Jen Wiss-Carline is a speara and keen coastal forager. In this series of posts, she shares some tips on how to make  the most of the free food waiting to be found along our shores.

I hope my previous post inspired you to venture out and explore what the coastal larder has to offer. There’s something magical about filling your bucket with delicious finds from the shore and turning them into a delightful meal for the family. If you’ve not already read part 1, do check out the post as it includes important information on regulations and gear. Now, in this second part, I’ll introduce you to more treasures you can find on the sea bed. Get your wellies ready – another tasty adventure awaits!

Scallops

With the tide at its lowest, you can sometimes hear scallops splashing and clapping in the sand. They hide themselves in little hollows, sometimes tucked under bits of seaweed but generally you just need to walk a sandy shoreline looking for that distinctive shell shape.  They tend to prefer locations away from stressful tidal activity so they can lead a peaceful life feeding on plankton and other small organic particles suspended in the water. To improve your chances, look for shells on the beach beforehand, if you find scallop shells washed up then the chances are you are going to be more successful on your forage. A bit of detective work can go a long way!

There are bigger king scallops and smaller queen scallops. I like the kings better for their taste – and regulations usually specify 100mm minimum for these. Again, check their shells are shut tightly so you know they’re still alive.

When you’re ready to cook them, slice them open with your knife. Ideally use a flexible knife and slide closely along the side that has a flat shell. The shell will now open and you can pull off the surrounding skirt which will leave the delicious white muscle and the roe. The pale white muscle is the premium cut, with the roes being a stronger flavour.  The muscle can be eaten raw but traditionally it is seared briefly in a hot pan for a couple of minutes. I think they’re delicious plain, or you can add a mix a few simple ingredients such as white wine, lemon, chilli, pepper, garlic or cream. One or all of those ingredients will give you a very tasty dish.

Winkles

These are a type of round marine snail and they make a tasty little snack. You only need boil them for 3 or 4 minutes, then you can pick them out with a cocktail stock, discarding the small disc that seals them in. Again, any type of garlic butter works exceptionally well, and then garnish with chopped chillies and coriander for a restaurant finish.

Oysters

It’s hard to believe you can gather wonderful fresh oysters for absolutely nothing when these cost so much to buy. We have two species: native and invasive. They are both found either on the sea bed or attached to rocks – it all depends what their egg first attached itself to. Wherever they land will be the place they spend the rest of their lives. The invasive species are significantly larger than the natives, making them the primary target.  Only keep those that are tightly shut and like all shellfish you can prolong their life in the fridge by placing some seaweed in the bowl and covering them with a damp tea towel.

I know people like to eat these raw but personally, given that they’re filter feeders, I like to grill them with butter and a squeeze of lemon. Make sure the shells open a little (they won’t open as much as mussels).  The people who do eat them raw follow the rule of “only when there is an ‘R’ in the month” as the colder water means there is less harmful bacteria for them to feed on.

In my next post, I’ll explore even more delicious finds from the seabed, including whelks, clams, and seaweeds – those abundant nutritional powerhouses!”

All images licensed through Envato.

Jen Wiss-Carline is a speara and keen coastal forager. In this series of posts, she shares some tips on how to make the most of the free food waiting to be found along our shores.

When I was a little girl, I used to love filling my plastic bucket with sea creatures for my mum to cook up. There was something extremely satisfying about finding juicy big cockles and mussels to bring a huge smile to her face, and she always made them smell wonderful. Now, as an adult, the soaring cost of food in supermarkets has provided me with a strong motivation to explore new ways to fill my table and freezer.

Whether you’re lucky enough to live near the coast or just visit occasionally, the ocean’s larder is always full of fresh, delicious and free food to forage, from crustaceans and molluscs to the mighty and often-overlooked seaweeds. It’s a great family day out with a lot of learning opportunities and the kids will love the thrill of finding you something to cook.

In this series of blog posts, I hope to inspire you to explore the shore, fill your buckets with tasty treats, and add the coastline to your list of favourite foraging haunts.

Rules and regulations

Before you venture to your nearest rocky shore in the search for tasty goodies, be aware that the Inshore Fisheries and Conservation Authorities (IFCA) make bylaws for all coastal regions in England which set out minimum sizes for taking shellfish to ensure that populations can reproduce before being harvested. You can check which IFCA region you fall under on this map, and there are links to the regional policies at the bottom of this page. In Wales, you can check the Natural Resources Wales for rules (have a quick search by species).

Please don’t take more than you need – we are lucky that this supply of mouthwatering free food isn’t overly regulated at the moment, and foraging sustainably helps to keep it that way.

Gear

If you’re staying on dry land, I recommend taking a knife and some catch bags with you, and waterproof shoes such as wellies or crocs – the rocks can be painful with bare feet. A rake is also helpful for foraging cockles. Check the tide times before you go – you want the tide to be going out so you can explore what has been left around the sea bed and rocky areas (I’ll get to more adventurous options later).  Ideally you want a spring tide which occur during full and new moons. This is when the gravitational forces of the Moon and the Sun align, either pulling together (new moon) or pulling in opposite directions (full moon), resulting in the most significant tidal ranges. This unearths much more of the sea bed than a typical tide and will be most productive.  Be sure to keep an eye on the incoming tide and don’t get cut off by it.

Before cooking

For all your foraged seafood, make sure you wash it very well in cold water before you cook it to get rid of sand and dirt. Some seafood such as whelks will also benefit from a couple of hours soaking too.

Cockles

Starting with my childhood favourite, cockles are so delicious and incredibly healthy, packed with protein.

They tend to lie a couple of inches below the sand for which a rake is a really handy tool to drag them up, although you might find some above. They must be foraged alive so their shells should be closed and they shouldn’t smell bad. If you find an open one, give it a tap on a hard surface to see if it closes up – otherwise discard. Cockles are best steamed by adding a cup of water to a large pan with a lid. You can add a splash of lemon if you want to. They take just a couple of minutes and their shells should pop open – otherwise get rid.

Mussels

Mussels are easy pickings to be found on the rocks, hanging on tightly by their little strings (“the beard”). Make sure they’re closed shut when you find them, and either twist them off or use a short knife to get underneath.

Before cooking, spend some time cleaning each one: cut off the beard and scrape off any small barnacles from their shells. This will ensure there is not grit in broth. There’s no shortage of very simple steamed mussel recipes to be found, ranging from white wine, butter and garlic broth to coconut milk, fresh coriander and sliced chillies. Most seafood recipes are interchangeable with other shellfish and literally take minutes to execute. Make sure the shells opens when you cook them – otherwise discard those that don’t.

In my next post, I’ll introduce three more of my coastal foraging favorites: winkles, scallops, and oysters. Get your bucket and wellies ready for a real teatime treat!All images licensed through Envato.

It has taken me a while to post this, so apologies for my tardiness. Earlier this year, in conjunction with Bwyd Powys Food and Builth Wells Community Hub, I led a wild food and foraging session with the aim to help local low or zero income families to learn about seasonal eating and how to improve their health for free, whilst increasing their nutritional intake.

It was a bit wet and cold, so a few people dropped out but we had eight people out and getting wet whilst learning about what is safe to eat and what isn’t, including 5 adults and 3 children.

We saw Stinging Nettles, Plantain, Dock, Hawthorn, Ground Elder, Cleavers, Mullein, Dandelions, Blackthorn flowers, Common Sorrel, Garlic Mustard, and Ground Ivy.

The learner foragers each took an identification card and harvested their chosen plant to be taken back to the hub.

Back at the hub we added some of our herbs to hot water to infuse and make a stock, meanwhile we got to chopping onions and plants. The younger members were tasked with frying the onions, adding risotto rice and gently cooking the risotto whilst adding the stock. When the risotto was cooked, they added the chopped plants and some grated cheese.

The risotto went down really well (especially with the younger foragers! Adults, take note, lol).

The session went down well, and we hope to repeat it at other times in the year to help educate about seasonal eating.

If you would like to do something similar with your group/organisation, reach out to Gavin at gavin@foundfood.com

Dandelion Root "Coffee" Cake

This cake is delicious and simple, and tastes a lot like coffee despite having no coffee in it!

Making the Roasted Dandelion Roots

  1. Gather and clean your dandelion roots.
  2. Remove the stringy little roots and cut into 5mm pieces.
  3. Pre-heat the oven to 160 degrees and place the roots on a baking sheet.
  4. Put the roots in the oven with the door slightly ajar for 15 minutes.
  5. Close the door and roast for a further 30 minutes, or until they turn a very dark brown.
    NOTE: You need to keep a close eye on them as it’s a fine line between very dark brown and burnt!
  6. Remove from the oven and allow to cool.
  7. Store in an airtight jar.
  8. Lightly grind a tablespoon in a pestle and mortar or coffee grinder, put it in a 2 cup French press (cafetiere), pour on hot water and leave to infuse for 30 minutes.

Making the Cake

Ingredients for sponge:

  • 250g Self-raising flour
  • 1 tsp baking powder
  • 225g butter (room temperature)
  • 225g caster sugar
  • 4 large eggs
  • 2 tablespoons dandelion root coffee.

Ingredients for icing:

  • 100g softened butter
  • 200g icing sugar
  • 2 tablespoon dandelion root coffee.

Method:

  1. Preheat your oven to 160 degrees (Fan).
  2. Line an 18x28cm baking tin with baking parchment.
  3. Put all the sponge ingredients in a bowl and mix until combined and smooth.
  4. Put the sponge mixture in the pan and level with a knife or spatula.
  5. Bake for 30 to 35 minutes or until a skewer comes out clean.
  6. Allow to cool in the tin for 10 minutes, then turn out onto a wire rack to cool fully.
  7. For the icing, beat the sugar and butter together until light and well mixed, then add the coffee and mix thoroughly.
  8. Spread the icing over the sponge and enjoy!
Dandelion Root "Coffee" Cake
Dandelion Root “Coffee” Cake

Not so much a recipe, more just an idea of what to do with these wild vegetables. Usually, they’re steamed or boiled and used as a wild alternative to asparagus, but get them young and small enough and they make an excellent pickle.

Ingredients:

  • Apple Cider Vinegar.
  • Young Rosebay Willowherb shoots.

Method:

  1. Pick young, small (less than 10cm) shoots.
  2. Fill a clean jar with the shoots and fill with apple cider vinegar to cover all the shoots.
  3. Leave in a warm, dry, dark place for 2 weeks.
  4. Enjoy!

Rosebay Willowherb shoots have a little tanginess to them, so I use organic apple cider vinegar to balance that with the sweetness of the apples.

Download Recipe Card

Click here to download

See Rosebay Willowherb on The Forager Helper.

Stinging nettles have been used for dyes, fibres, herbal remedies and food for hundreds of years. During WW2, the British used nettles for their dark green dye for camouflage, and the Germans used huge quantities of nettles for their fibres to make military uniforms.

Habitat

It is native to Europe, Asia, northern Africa, and naturalised in North America, and introduced elsewhere. It can be found on waste ground, hedgerows, woods etc, preferring a rich soil and avoiding acid soils. Patches of healthy nettles are said to be an indicator of fertile ground, and possibly an indicator of previous human occupation.

Description

It is a herbaceous perennial flowering plant in the family Urticaceae. The species is divided into six subspecies, five of which have many hollow stinging hairs called trichomes on the leaves and stems, which act like hypodermic needles, injecting histamine and other chemicals that produce a stinging sensation upon contact (contact urticaria).
Urtica dioica is a perennial growing to 1.2 m quickly.
“dioica” refers to the botanical term, “dioecious” meaning that male and female flowers are on different plants.

Identifying Features

Stinging nettles
  • Leaves – The soft, green leaves are 3 to 15 cm long and grow in opposite pairs on an erect, wiry, green stem. The leaves have a strongly serrated margin, a cordate base, and an pointed tip with a terminal leaf tooth longer than adjacent lateral teeth.
    • The leaves and stems are very hairy with non-stinging hairs, and in most subspecies, also bear many stinging hairs (trichomes or spicules), whose tips come off when touched, transforming the hair into a needle that can inject several chemicals causing a painful sting or paresthesia, giving the species its common names: stinging nettle, burn nettle, burn weed, or burn hazel.
  • Flowers – It bears small, greenish or brownish, numerous flowers in dense axillary inflorescences.
  • Roots – It has widely spreading rhizomes and stolons, which are bright yellow, as are the roots.

Pictures

Uses

Food

Young leaves – can be cooked and used the same as spinach (i.e. boiled or steamed) and added to soups etc. They also make excellent fried crisps. They can also be dried for winter use. Nettles are a very valuable addition to the diet, they are a very nutritious food that is easily digested and is high in minerals (especially iron) and vitamins (especially A and C). Cooking the leaves, or thoroughly drying them, neutralises the sting, rendering the leaf safe to eat. Heating to above 60 degrees celcius renders them sting-less by bursting the sack of chemicals at the base of each sting. Dehydrating nettles breaks the needles, rendering them safe. The needles can also be broken by physical means, such as slapping, flattening with a rolling pin, etc. The young shoots, harvested in the spring when 15 – 20 cm long complete with the underground stem are very nice. Old leaves can cause an upset stomach. The juice of the leaves, or a decoction of the herb, can be used as a rennet substitute in curdling plant milks for making cheeses. Nettle wine is brewed from the young shoots, and a strong nettle decoction can be added to brewing ale for flavouring.

See Stinging Nettle Cordial

Medicine

Nettles have a long history of use in the home as a herbal remedy and nutritious addition to the diet. A tea made from the leaves has traditionally been used as a cleansing tonic and blood purifier so the plant is often used in the treatment of hay fever, arthritis, anaemia etc.

Other uses

A strong fibre is made from the stems. Used for making string and cloth, it also makes a good quality paper. It is harvested as the plant begins to die down in early autumn and is flattened and dried before the fibres are extracted. The fibre is produced in less abundance than from flax (Linun usitatissimum) and is also more difficult to extract.

The plant matter left over after the fibres have been extracted are a good source of biomass and have been used in the manufacture of sugar, starch, protein and ethyl alcohol.

An oil obtained from the seeds is used as in oil lamps.

The leaves are also an excellent addition to the compost heap and they can be soaked for 7 – 21 days in water to make a very nutritious liquid feed for plants. This liquid feed is both insect repellent and a good foliar feed.

The growing plant increases the essential oil content of other nearby plants, thus making them more resistant to insect pests.

Although many different species of insects feed on nettles, flies are repelled by the plant so a bunch of freshly cut stems has been used as a repellent in food cupboards. The juice of the plant, or a decoction formed by boiling the herb in a strong solution of salt, if rubbed into small seams of leaky wooden tubs, will coagulate and make the tub watertight again.

A hair wash is made from the infused leaves and this is used as a tonic and antidandruff treatment.

A beautiful and permanent green dye is obtained from a decoction of the leaves and stems. A yellow dye is obtained from the root when boiled with alum.

Folklore

Being very common, the stinging nettle has much lore and myth surrounding it; here are some of the more common ones:

  • The name “Nettle” is said to have come from the Anglo-Saxon word for needle, probably referring to its stinging needles (hairs), or possibly referring to its value as a thread (seems less likely).
  • In Irish mythology, when the children of Lir (sea god) returned from hundreds of years in exile, they found their home overgrown with nettles; as did Oisin on returning to his great hall. Unsurprising when nettles are so commonly found in wasteland and abandoned places.
  • Dreaming of gathering nettles is said to mean that someone likes you, or that your marriage will be a happy one; Whereas dreaming of being stung means something bad is coming.
  • In Germany and Wales, folk songs associate nettles with love and fertility.
  • Across the British Isles, many stories exist concerning the origin of nettles, including that they mark the spots where Satan and his fallen angels fell to earth, that they grow from dead men’s bodies or from the spilling of innocents’ blood, and that they grow from human urine (though they do prefer nitrogen rich soil, so there may be some truth in that one!).
Prof. Dr. Otto Wilhelm Thomé Flora von Deutschland, Österreich und der Schweiz 1885, Gera, Germany

Known hazards

The leaves of the plants have stinging hairs, causing irritation to the skin. This action is neutralized by heat or by thorough drying, so the cooked leaves are perfectly safe and nutritious. However, only young leaves should be used because older leaves develop gritty particles called cystoliths which act as an irritant to the kidneys. Possible interference with allopathic drugs for diabetes mellitus, hypertension. Central nervous system depression drugs (e.g. morphine, alcohol) may also interact with nettle. Avoid during pregnancy.

Harvesting

It is in leaf from March. It is in flower from May to October, and the seeds ripen from Jun to October.
For medicinal purposes, the plant is best harvested in May or June as it is coming into flower and dried for later use.

Potential lookalikes

White deadnettle (Lamium album) can look very similar, but bears distinctive white flowers. Also edible.

Sources

  1. Wikipedia – https://en.wikipedia.org/wiki/Urtica_dioica
  2. Examine – https://examine.com/supplements/stinging-nettle/
  3. Progessive Health – http://www.progressivehealth.com/stinging-nettle-extract-may-help-reduce-swollen-pr.htm
  4. Grieve. A Modern Herbal. Penguin 1984 ISBN 0-14-046-440-9
  5. Bown. D. Encyclopaedia of Herbs and their Uses. Dorling Kindersley, London. 1995 ISBN 0-7513-020-31
  6. Moerman. D. Native American Ethnobotany Timber Press. Oregon. 1998 ISBN 0-88192-453-9
  7. Chevallier. A. The Encyclopedia of Medicinal Plants Dorling Kindersley. London 1996 ISBN 9-780751-303148

It’s difficult to think of nettles in anything other than savoury but I hope this recipe will change your mind . The reason I like this recipe is because I wanted to find a use for the older nettle leaves that I can’t use for eating fresh like you do with the nettle tops. This is perfect with ice, goes nicely with a G&T and with tonic water.

I will often make this with the discarded nettle leaves I won’t use for making crisps.

Ingredients:

  • 200g nettle leaves.
  • 500g caster sugar.
  • 4 Squeezed Lemons or 4tbsp lemon juice.
  • 500 ml water.

Method:

  1. Put your nettles and water in a large pan and bring to the boil for 10 minutes.
  2. Strain the nettles out of the liquid through a fine mesh colander or a cloth.
  3. Take the strained juice and add the sugar to it.
  4. Put this back on the heat and warm slowly, stirring until the sugar is dissolved.
  5. Remove from the heat and stir in the lemon juice.
  6. Allow it to cool and place in sterilised bottles.
  7. Use within 6 months, once opened keep in the fridge and use within 2 weeks.
  8. Enjoy with sparkling water, water or add to jellies, ice lollies to give a wild nettle flavour.